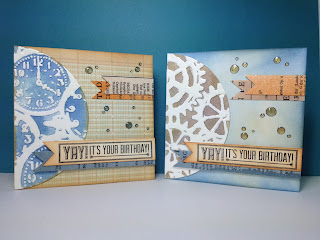
Coincidentally, right before I made these cards, I came across a blog named {Lawn}scaping Challenge with an embossing theme. It worked out perfectly for me because I had planned to do some dry and heat embossing on my cards. So I'll enter this challenge/contest and see if my cards are good enough to win. =P
I first cut a semi circle out of some watercolour paper. Then I dry embossed it using one of Tim Holtz/s embossing folders. After that I used a brayer to roll some Perfect Medium (clear embossing ink) on top of the embossed image, hitting only the raised areas. Then I sprinkled white embossing powder on it and melted it with my head tool. I had to repeat that several times to achieve a smooth coverage. Finally, I painted it with watercolour paint. The heat embossed areas were resistant to the watercolour paint, therefore those areas stayed white. (I learned this awesome technique from one of my favorite crafters/card makers, Mel McCarthy)
I created my own enamel dots by drawing dots with a Sakura Luxue pen. It was the perfect colour for this card, a mixture of blue and gold/brown. After the ink dried I added some Glossy Accents to turn them into 3D dots.
I used the same technique for this card except I used a different dry embossing folder (I think it came in the same set as the clock one). I couldn't find the right pattern paper for the background so I created my own by rubbing Distressed Inks (in Faded Jeans and Tea Dye) on the white card base.
The enamel dots on this card was created the same way as on the first card.
So there you go, my two masculine birthday cards. = )
Thanks for visiting,
Cheryl ~


